Want to run multiple WordPress in XAMPP at subdomain? This tutorial would be helpful.
Step 1. Delete Intro pages and add an
index.htmpage

Step 2. Create Index.html for
localhost

<!doctype html>
<html lang="en-IN">
<head>
<meta charset="UTF-8">
<title>Gulshan Kumar</title>
<meta name="viewport" content="width=device-width, initial-scale=1">
<style>
body { font: 40px -apple-system,BlinkMacSystemFont,"Segoe UI",Helvetica,Arial,sans-serif,"Apple Color Emoji","Segoe UI Emoji","Segoe UI Symbol", sans-serif; color: #116b63; background: #14094e; text-align: center; padding: 100px; }
h1 { font-size: 50px; color: #ffffff;}
ul { display: block; text-align: left; width: 650px; margin: 0 auto; }
a { color: #ffffff; text-decoration: none; line-height:2;}
a:hover { color: #2cdc00; text-decoration: none; }
</style>
</head>
<body>
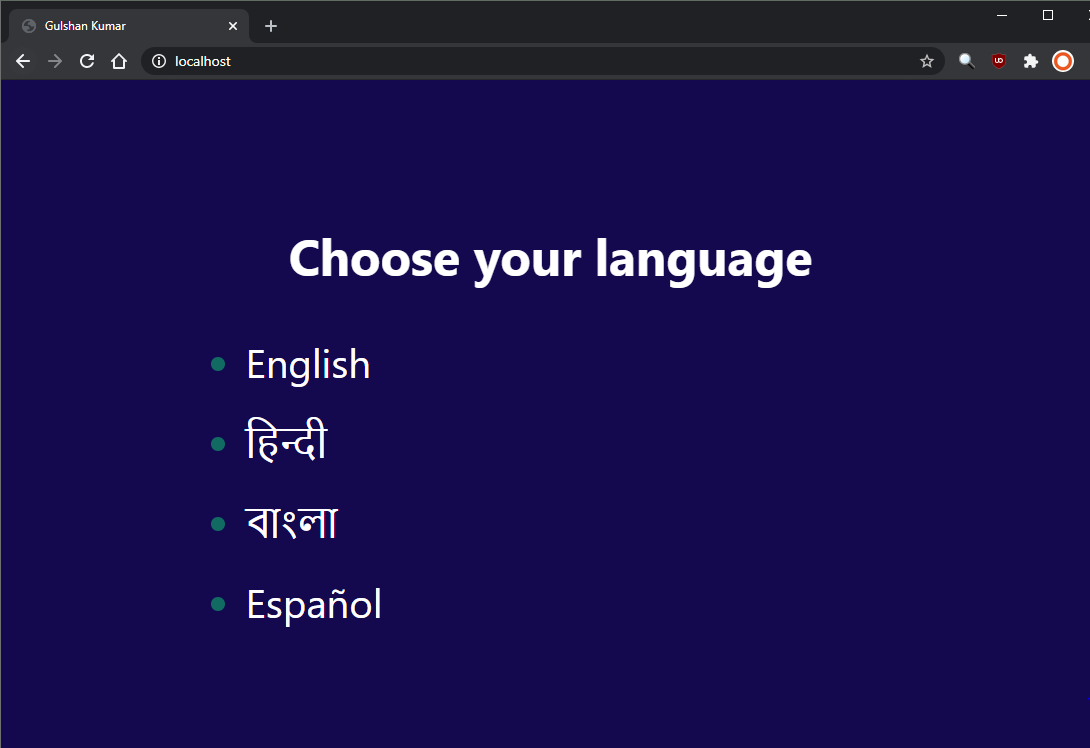
<h1>Choose your language</h1>
<ul>
<li><a href='http://en.gulshankumar.org'>English</a></li>
<li><a href='http://hi.gulshankumar.org'>हिन्दी</a></li>
<li><a href='http://bn.gulshankumar.org'>বাংলা</a></li>
<li><a href='http://es.gulshankumar.org'>Español</a></li>
</ul>
</body>
</html>
Finally, it would be like this ![]()
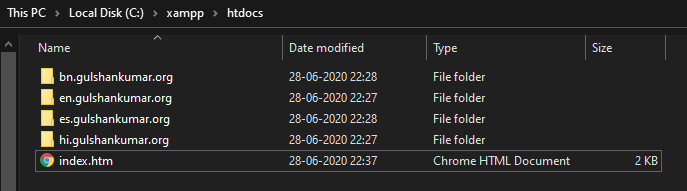
Step 3. Create four Directories for your four Subdomains
Step 4. Edit the file
C:\xampp\apache\conf\extra\httpd-vhosts.conf
- Put configuration rules as below in the bottom.
- Avoid using HSTS enabled hostname
# Localhost
<VirtualHost *:80>
    ServerAdmin webmaster@localhost
    DocumentRoot "C:/xampp/htdocs/"
    ServerName localhost
    ServerAlias www.localhost
    ErrorLog "logs/localhost-error.log"
    CustomLog "logs/localhost-access.log" common
</VirtualHost>

# Do not use HSTS enabled domain to avoid messing with browser.
# English
<VirtualHost *:80>
    ServerAdmin webmaster@localhost
    DocumentRoot "C:/xampp/htdocs/en.gulshankumar.org"
    ServerName en.gulshankumar.org
    ErrorLog "logs/en.gulshankumar.org-error.log"
    CustomLog "logs/en.gulshankumar.org-access.log" common
</VirtualHost>

# Hindi
<VirtualHost *:80>
    ServerAdmin webmaster@localhost
    DocumentRoot "C:/xampp/htdocs/hi.gulshankumar.org"
    ServerName hi.gulshankumar.org
    ErrorLog "logs/hi.gulshankumar.org-error.log"
    CustomLog "logs/hi.gulshankumar.org-access.log" common
</VirtualHost>

# Spanish
<VirtualHost *:80>
    ServerAdmin webmaster@localhost
    DocumentRoot "C:/xampp/htdocs/es.gulshankumar.org"
    ServerName es.gulshankumar.org
    ErrorLog "logs/es.gulshankumar.org-error.log"
    CustomLog "logs/es.gulshankumar.org-access.log" common
</VirtualHost>

# Bangla
<VirtualHost *:80>
    ServerAdmin webmaster@localhost
    DocumentRoot "C:/xampp/htdocs/bn.gulshankumar.org"
    ServerName bn.gulshankumar.org
    ErrorLog "logs/bn.gulshankumar.org-error.log"
    CustomLog "logs/bn.gulshankumar.org-access.log" common
</VirtualHost>
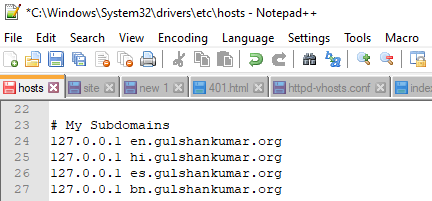
Step 5. Point all subdomains to
127.0.0.1in the hosts file
Before you can edit and save, you need to ‘Allow’ Full Control to yourself.
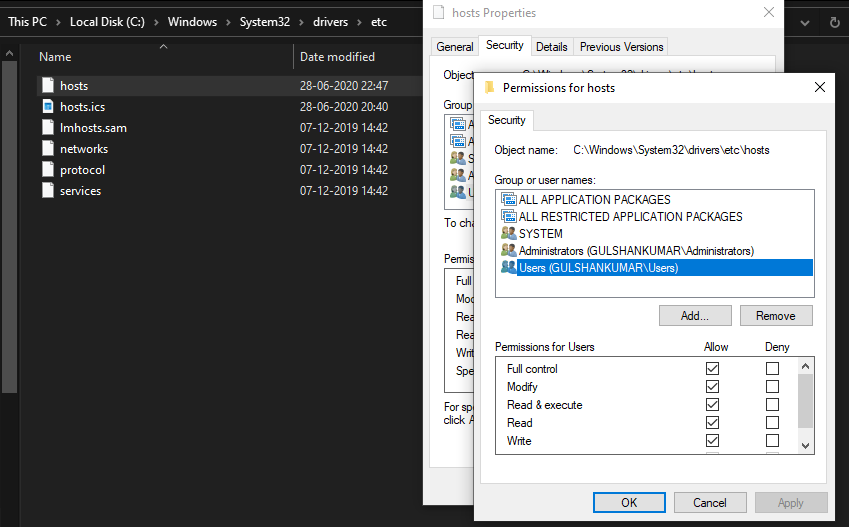
Find hosts at C:\Windows\System32\drivers\etc\
Once subdomain pointed, you can revert permission back. (optional)
Install WordPress
- Open XAMPP > Shell
Login to MySQL, press enter when it ask password
mysql -u root -p
- Type below command to create Database
create database wordpress;
grant all on wordpress.* to wordpress@localhost identified by 'passswordzzz';
flush privileges;
exit;
Next, add Extracted WordPress cores files to the respective directory in htdocs.
Visit web page and run 5-min famous installation page, follow same for all subdomains.
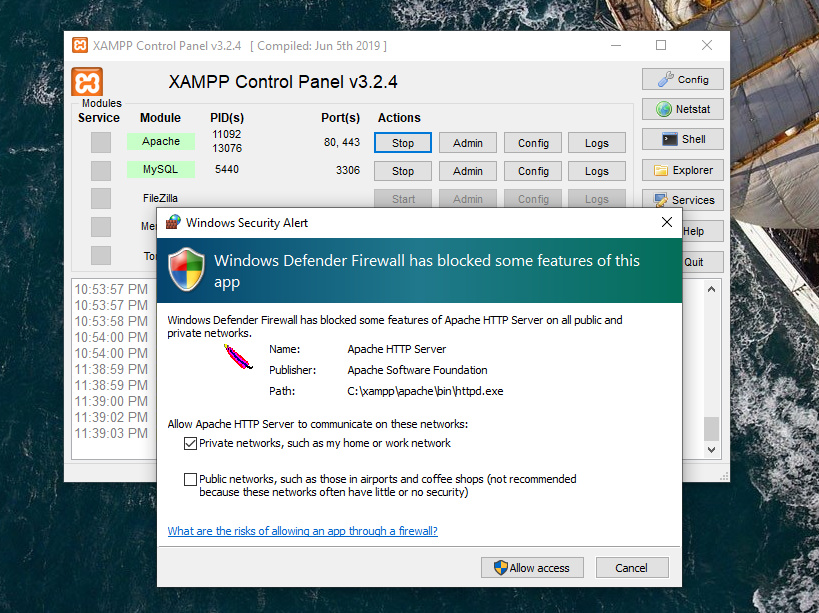
Adjust Firewall for Enhanced Security
-
Go to “Windows Defender Firewall and Advanced Security” > Restore Default Policy
-
Now stop and start Apache server.
-
If first time it will ask which type of network to allow? Select Private and then Allow access. If you keep public and being on Static IP by chance then it will expose site to the world.
-
Same, restart MysQL as well.
You should be all set by now.
